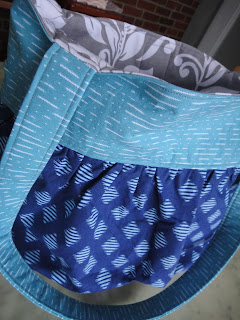
Some time ago, I was perusing comments on some Facebook photos of my sewing projects, and I noticed an old one from a cousin of mine about a Kindle sleeve I'd made for another cousin, saying how much she liked it.
I immediately put it on my list to make her one, but when I sought out advice from her hubby about what fabrics/colors she might like, he told me she didn't really use her Nook anymore but that she really wanted a tote to use for work. Perfect!
I searched for a while for the perfect tote tutorial, knowing she needed a pretty big one for the binders she has to tote to work but that it should be both pretty and functional. I had pinned this Gathered Bag Tutorial from BumbleBee Bliss a while back, and after getting the approval from the hubs, I decided to move ahead with it.
He said she likes grays, navy blues, and teals, and I love the way the three came together. I think it has just the right amount of personality but still works for work.
I followed the tutorial with some major tweaks. First, I enlarged it a bit to make sure it was big enough for her binders (although in the end, I wished I'd made it even bigger). I also added a pocket on the inside and magnetic snaps to keep it closed. For the straps, I used medium-weight interfacing on double-folded fabric instead of the ruffled straps she uses, and I omitted the grommets (perhaps the only change I regret making; I think the grommets might have added some much-needed style interest to the outside).
The coin purses were made using this great tutorial from Me? A Mom?. I used the navy and teal fabrics on both, switching which fabric was on the inside and outside so they were similar but distinct.
And lookie there, a matching set!
My grandmother is a big-time reader, so I thought it would be fun to make her a little set of fabric bookmarks for Christmas. I used this tutorial from Little Birdie Secrets as my starting point but mostly for the sizing and initial stitching. After that, I took off on my own.
Instead of applying fusible interfacing to the fabric, I cut the fabric as outlined in the tutorial and stitched up the side and bottom. Then, I turned it right-side out and inserted a piece of non-fusible heavyweight interfacing that was slightly thinner and shorter than the bookmark through the top opening.
After that, I cut a little piece of ribbon, folded in the fabric at the top opening, inserted the end of the ribbon into the opening, and topstitched around the whole thing. Boom! Cute bookmarks in almost no time.
Just one more gift post coming your way...


No comments:
Post a Comment
Got something to say? I'd love to hear it! Thanks for commenting. (All comments are moderated, so it may take a little while for yours to appear. Just hit "Publish," and I'll take care of the rest.)