Wednesday, July 27, 2011

WIP Wednesday #12

Hello, Wednesday! It's time for an update. (In case you've missed out, I'm following along with Freshly Pieced's W.I.P. (Work In Progress) Wednesday series as a good way for me (and you) to keep track of what's going on around here.)

Completed this week:
Handkerchiefs/cleaning rags for my sister (and a mini tutorial for them!)

Started this week:
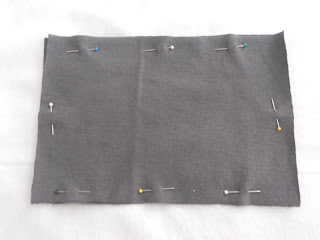
Baby blanket for a friend — everything's cut and pinned, so now I just need to get to the machine!

In progress/On the "to do" list:
A few more makeup bags
Hide and Seek Spectrum baby quilt — Everything's washed and ironed — now I just have to start cutting!
Empire Waist Cinch for me from Handmade Beginnings
Baby shower gifts for several friends
Nursery bedding for the biscuit: crib dust ruffle, crib mobile, and lots of crib sheets
Other biscuit-related projects

Hope everyone has a great rest of the week. And be sure to click on the button to check out other great WIPs for more inspiration!
WIP Wednesday at Freshly Pieced

Tuesday, July 26, 2011

Mini tutorial: Handkerchiefs/cleaning rags upcycled from t-shirts


Matt and I try to be as "green" as possible, and my older sister's the same way (and perhaps even more so among other things, she's been known to pick recyclables out of other people's trash to recycle in hers). Several months ago, she asked our grandmother to sew her a few handkerchiefs using some old t-shirts she had, which our grandmother gladly did. They came in so handy that Vanessa asked me to make her a whole bunch more.
They're incredibly easy and basic to make, so I'm not sure a tutorial's even necessary, but I figure someone might benefit from it (and maybe it'll encourage you to make a few rags of your own). These are the perfect size to use as handkerchiefs or cleaning rags for around the house, but of course, you could change it up to make them any size that works for you. Depending on what size t-shirt you have and the size of your rags, you could get up to 10 rags from one shirt. Oh, and in addition to recycling some old t-shirts, this is also a great way to use up small thread spools you may have or to clear off one of the bobbins you've been holding onto that has just a bit of thread (do other people do that, or is it just me?).

Materials:
* t-shirt
* thread
* general sewing supplies

A few general notes before we start:
1. Again, you can make these rags any size you want. I started by cutting the sleeves off the shirt (you can get one rag out of each sleeve) and then basing the size of my other cloths on that, but you could also measure a washcloth or handkerchief you already own and use that size. Also, feel free to just start cutting whatever size seems right.

2. Because I viewed this as a recycling project and the final items were only being used for cleaning rags, I wasn't too worried about the thread matching the t-shirt or using an obvious edgestitch to close the whole left for turning. If you want a prettier final product, you can of course use coordinating thread and/or handstitch the opening closed. You might also want to concern yourself more with making sure each one is the same size, which is easily done.

Instructions:
1. Lay your shirt out flat. Align your ruler from the armpit junction of one sleeve to the top seam of the sleeve and cut off the sleeve. Repeat on the other side.
2. Cut the shirt open along one side so you can lay it out flat. I find this makes it easier to cut the remaining pieces, but you could also cut the shirt up while it's still intact. Cut the shirt up into as many (even-numbered) pieces as you can (make sure that each piece has a matching piece of the same size).

3. Iron each piece and then match them up according to size. Lay each set together with wrong sides facing (depending on your shirt, you may not be able to tell the "right" side from the "wrong" side, and that's fine) and pin them together well.
4. Using a 1/4"-1/2" seam allowance, sew along the outside of each set, leaving a 2" hole on one side for turning. Be sure to backstitch.
5. Press, clip your corners, and turn. Using a bamboo stick or something similar, push out the corners and press again, making sure you flatten out the hole you left for turning and push the fabric in so it's even.

6. Edgestitch the opening closed and press again.
7. You're done! Go blow your nose or clean something!

A few notes about the sleeve pieces:
1. As I said above, I wasn't worried about having perfect rectangles, so I cut the sleeves to use as much fabric as possible, which meant that they were imperfectly shaped. You can square them up if you prefer. Also, because you only detached the sleeve from the body of the shirt, the material's already connected along two sides (the top and bottom of the sleeve), so you'll only need to sew up the other two sides (instead of all four sides, like all of the other pieces). First, sew straight across the end of the sleeve, making sure you start and end right at the edge of the fabric.
2. On the side of the sleeve that was connected to the shirt, sew all the way across but leave your 2" hole for turning.
3. As you can see, on the gray shirt, I left the serged end of the sleeve intact, sewing my seam allowance outside of the serging. However, I found that when I turned and pressed the rag, this end was pretty bulky and wouldn't lay quite flat. So on the green shirt, I decided to sew just inside the serging and then trim the seam allowance through the middle of the serging.
While this made a smaller rag, it helped with the bulky seam, and I'd recommend it if you don't mind the smaller size. You can see the size difference below in the final sleeve rags.

Monday, July 25, 2011

Thankful Mondays #22

Happy Monday! Each Monday, I'm writing about things I'm thankful for. This is week 22. Read more about it here. (And sorry for the lack of pictures this week!)

316. handkerchiefs
317. public libraries
318. baby cacti
319. finishing my pile of thank-you notes
320. a husband who runs errands and lets me stay inside
321. random text messages from my little sister
322. two friends having their first babies this week (good luck Katie and Rachel!)
323. public pools
324. the end of our summer travels
325. summer blockbusters
326. good baby advice
327. a good interview for my mom
328. getting to taste-test my friend's State Fair peach pie entry (thanks, Susanne!)
329. smoothies
330. that all of the maternity clothes I ordered online actually fit!

Wednesday, July 20, 2011

WIP Wednesday #11

Hello, Wednesday! Despite having a lot of other plans, it was still a productive sewing weekend, so I'm checking things off right and left. (In case you've missed out, I'm following along with Freshly Pieced's W.I.P. (Work In Progress) Wednesday series as a good way for me (and you) to keep track of what's going on around here.)

Completed this week:
 Valances, pillow, and taggie blankets for a friend's nursery

Started this week:
Handkerchiefs for my sister

In progress/On the "to do" list:
A few more makeup bags
Hide and Seek Spectrum baby quilt — Everything's washed and ironed — now I just have to start cutting!
Empire Waist Cinch for me from Handmade Beginnings
Baby shower gifts for several friends
Nursery bedding for the biscuit: crib dust ruffle, crib mobile, and lots of crib sheets
Other biscuit-related projects

Hope everyone has a great rest of the week. And be sure to click on the button to check out other great WIPs for more inspiration!
WIP Wednesday at Freshly Pieced

Tuesday, July 19, 2011

Another's nursery

About a month ago, my friend Katie (who's having twins any day) asked if I'd make some valances for her nursery. Of course, I jumped at the chance, and after working out the design and all the details, I finally got them sewn up this weekend.

Katie's mom is making the babies' quilts, so they'd already picked out the fabric, and Katie wanted the valances to match. The fabrics are Playday Elephants in Summer by SEI for Robert Kaufman Fabrics and the Red Dot fabric that goes with the collection (sorry I don't know the actual name, but it looks like it's impossible to find online anyway), both purchased from our local quilt shop.
For the valances, I mostly followed the tutorial on Simply Modern Mom, but I didn't do the tabs on the back. Since you fold over the top fabric with enough room for a curtain rod anyway, I didn't see the point in adding separate tabs on the back. I love the way they turned out. (Oh, and there are two valances; the picture above was taken after I'd only made one to test out the measurements.)
I ended up with some extra fabric, so of course I decided to put it to good use. I started off by making a very basic pillow for her rocking chair, and then there was just enough left to make a few taggie blankets.
I hope Katie, Chris, and the babies love them!

Monday, July 18, 2011

Thankful Mondays #21

Happy Monday! Each Monday, I'm writing about things I'm thankful for. This is week 21. Read more about it here. (And sorry for the lack of pictures this week!)

301. Harry Potter
302. summer produce
303. that we have so many great farmers' markets around us
304. the Nutella banana pop I got to cool me down at the farmers' market this weekend
305. being able to sew things for friends and family
306. finding a new freelance client
307. pre-addressed and stamped thank-you cards (My sister is brilliant.)
308. finding ways to use fabric scraps
309. starting my prenatal water aerobics class
310. getting to feel Biscuit move
311. the joy on Matt's face when he first felt Biscuit move
312. A/C
313. my mom's job interview
314. 24.5 healthy weeks!
315. making new girlfriends

Thursday, July 14, 2011

A bed for biscuit

It's been a good week for our little biscuit because he's finally getting his room started. Our crib arrived today(!), and though we won't be putting it together for a while longer, I plan on starting on the bedding soon because we also got our fabric this week!
We debated on the fabric for a long time. We were originally going for a teal, lime green, and gray color scheme, but then a print we bought from our friend Susanne convinced us to go in the orange direction. When I found the Marine collection by Dan Stiles, I fell in love.
We wanted something modern but still cute, and this fit the bill perfectly. I'm planning on making several crib sheets, a dust ruffle for the crib, some wall art, and the crib mobile. I decided not to make a crib bumper (as much as I'd love the extra color and fabric!) because they're just not considered safe anymore, and this fabric was too expensive to buy two yards for something that's only decorative and used for a few months. I'm hoping the dust ruffle will add the needed punch of color.
(clockwise in the top picture) We're using Marine Birds, Urchin Forest in Daylight, Whale Love, Marine Life, and Organic Sunset (all fabrics from the Dan Stiles organic Marine collection for Birch Fabrics, purchased from Fabricworm.com).

Monday, July 11, 2011

Thankful Mondays #20

Happy Monday! Each Monday, I'm writing about things I'm thankful for. This is week 20. Read more about it here.

286. surprise baby showers
287. cute baby clothes
288. planned baby showers
289. cloth diaper cakes
290. an amazing family who loves reunions
291. wonderful friends who traveled far and wide for my shower
292. the blessing of gifts for the Biscuit
293. American independence
294. safe travels
295. fireworks
296. finally deciding on fabric for the nursery
297. A/C
298. sweet little puppies
299. pools
300. cornhole