

Remember this sleeping bag I made for Beckett a while back? He's still loving his, so I thought I'd put together a little tutorial in case you wanted to make one of your own.

**UPDATE: I've now posted a Summer version of this sleeping bag as well. It's not lined (so it's lighter for the cooler months) and uses French seams to keep the inside looking pretty. You can find the tutorial here.
First, a few things. The measurements below were based on my three-and-a-half-month old son (who's pretty average in size), but the bag is pretty big, and I expect it will fit him for a long time. He's now five months old, and he still has plenty of room left. Also, you can make a bag of this size out of two yards of fabric (one yard for the outside, and one yard for the inside) as long as the pattern on your fabric isn't directional or runs horizontally (from cut end to cut end). If your pattern runs vertically, you'll need a few extra inches. Either way, you'll have some scraps left over.
First, a few things. The measurements below were based on my three-and-a-half-month old son (who's pretty average in size), but the bag is pretty big, and I expect it will fit him for a long time. He's now five months old, and he still has plenty of room left. Also, you can make a bag of this size out of two yards of fabric (one yard for the outside, and one yard for the inside) as long as the pattern on your fabric isn't directional or runs horizontally (from cut end to cut end). If your pattern runs vertically, you'll need a few extra inches. Either way, you'll have some scraps left over.
What you'll need:
1 yd. outer fabric (I used quilting cotton.)
1 yd. inner fabric (I used an old t-shirt because I wanted to save my fancy fabric but still wanted something soft and cozy. Quilting cotton, minky, silk, and flannel would all be good options here as well.)
Coordinating thread
1/2" elastic (to determine the length, measure around your child's chest and add 1/2"; mine was 17")
Sleeping bag template

The template was too big for me to easily make a pdf for you to print (plus, since the measurements really depend on your child's measurements, I figured it made more since for everyone to make their own). But it's really simple. I made mine on a big piece of craft paper. It should be shaped like this (an isosceles trapezoid, if that helps):

I used the following measurements:
Length: 25"
Width at the top: 11.5"
Width at the bottom: 18.5"
I figured out the length and width at the bottom by measuring a sleep sack I had that still fit him (HALO Swaddle Sleep Sack, size small) and then adding a few inches (not very scientific, sorry). The top was based on my son's chest measurement (16.5"). Since I wanted the top to be gathered once I inserted the elastic, I estimated I should add about 6" to the final size of the top (16.5" chest size + 1/2" seam allowance + 6" = 23" total), so half that (since the template is for one side of the bag) was 11.5". (Hopefully, this makes sense. Please feel free to leave a comment or email me if you're confused and want some help). So, to find the measurement for the top of your template, measure all the way around your child's chest, add 6.5, and then divide that number by 2. Once you have that, make your template, and let's move on.
To cut your outer fabric, fold it in half from selvage to selvage. Place your template on top, and cut out two pieces (for the front and back).
If you're using yardage for your inner fabric as well, repeat the previous step. If you're using a t-shirt like I did, it's a bit more complicated unless you have a really big t-shirt.

I used an old t-shirt of mine (size medium), so there wasn't much wiggle room in terms of fabric. First, cut out one side of your bag from the back of the t-shirt (unless you have a really small t-shirt, you should have just enough room here if you're using the same measurements I did).
For the other side of the bag, we're going to have to do some piecework because the front of the shirt isn't as long as the back (because the neck scoops down). If you don't like the look of this, use a really big t-shirt or yardage instead, but since this is only the inside of the bag, which hardly anyone will see, I wasn't too worried about it not looking as nice as the outside.
First, place the template on the front of the t-shirt so that you're cutting out as much of the template as possible while also leaving as much fabric intact as possible. To do this, I scooted the template as close to the side as I could. Make sure the bottom is the part of the template that doesn't fit (so the piecework will be hidden at the bottom of the bag, not visible at the top). Now, cut out your template.
Next, cut a large rectangle out of the remaining t-shirt fabric. It needs to be at least as wide as the bottom of your template and at least as tall as however much fabric you're missing from the bottom of your piece.
Pin this piece to the bottom of the short piece you cut from your template, right sides together. Using a 1/4" seam allowance, sew the two pieces together.

Press. Lay your template on top of the newly attached piece, and cut your fabric down to size to match the template.

If you feel so inclined, top stitch the seam allowance down to reinforce it and reduce bulk. When you're done, it should look like this:

Okay, now that we have four even pieces, let's get to work. Take your two outer pieces and lay them right sides together. Pin around the sides and bottom, then sew them together using a 1/4" seam allowance.

Clip your corners.

Turn the bag right side out and press.


Clip your corners and press. Next, place your outer bag inside your inner bag (so that the right sides of the inner and outer bags are touching and the raw edges at the top are even).

Align your side seams and pin around the top edge.

Using a 1/4" seam allowance, stitch around the top edge of the bags. Press. Pull the outer bag through the hole you left in the bottom of the inner bag.

It should look like this when you pull it all the way through:

Push the inner bag back inside the outer bag and press well.

Topstitch around the top of the bag. For sturdiness and because I liked the way it looked, I chose to use a double topstitch.

Now we're going to make the casing for our elastic. You need to leave a 1-2" gap in your stitching so you can insert the elastic in the next step. I like to mark this with two pins to remind myself to stop.

Stitch a line around the bag 7/8" down from and parallel with your topstitching.

Attach a safety pin to the end of your elastic.

Holding firmly to your safety pin, reach through the hole in the bottom of your inner bag and then up between the inner and outer layers until you find the gap you left in your elastic casing. Use the safety pin to guide the elastic through the casing and out the other side.

Once you've made it all the way around, your elastic should come out the other end and look like this:

Check to make sure your elastic isn't twisted anywhere, and then overlap the two ends of the elastic and sew them together using a zigzag stitch.

Now you just need to sew everything up. First, stretch out the top of the bag so that the elastic is pulled into the casing and is no longer sticking out. Then, close the hole in the bottom of the inner bag using an edgestitch. Finally, on the outside of the bag, stitch up the gap you left in the elastic casing, and your baby sleeping bag is done!


Stay tuned for a tutorial for the summer (i.e., unlined) version of the bag)!
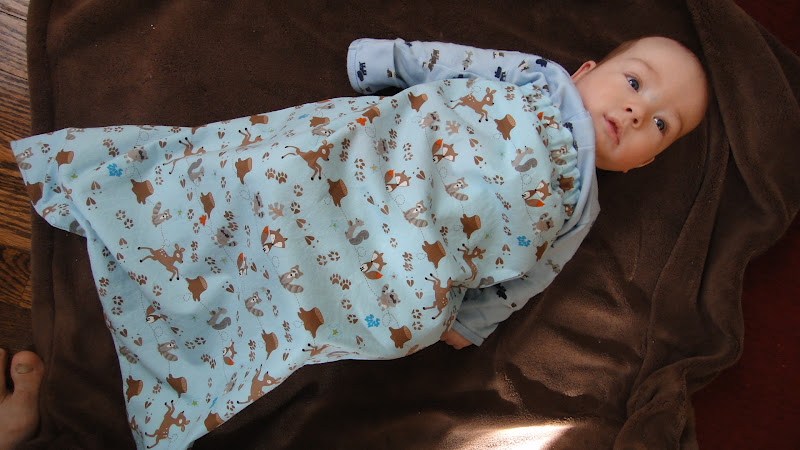

Hope your sleeping bag works this well, too:

Goodnight, baby.
how cute! thanks for the tutorial:)
ReplyDeletehow cute! thanks for the tutorial:)
ReplyDeletenice article...im glad to see it.....and read it..its a greatly informative for me ..thanks for sharing
ReplyDeletea great blog with nice article written is really like by me...having alot of info of this kinds of users..im glad to see it..raaly thanks for share it to me
LOVING IT!
ReplyDelete