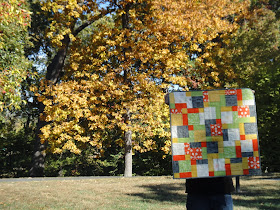
So we set about picking out the right fabric and pattern. He chose both with a little bit of guidance from me. The fabrics are all from the popular Comma collection (hence the playful name of the quilt; Matt's a professor) with a few Kona solids thrown in.
The pattern is a modified version of this Disappearing 9-Patch Baby Quilt from Janice Ryan on Craftsy. I made it smaller by leaving off one row and one column of blocks, and I used 4.5" blocks (instead of 5") for my starting blocks. The final quilt measures just shy of 30" square, a perfect size for a sizeable wall hanging.We didn't want to introduce yet another fabric since there were already so many in the quilt front, so we wound up back at my LQS and bought a little more of the gray and black comma fabric, which ended up being a perfect binding. I'm so glad Matt changed my mind. I also think the dark gray acts as a great border and really offsets all the busyness of the front. A scrappy binding would have just blended right in.
I was really pleased with how the quilting turned out as well. I used green thread that matched the solid green in the quilt and then did a sort of wandering random maze pattern throughout. I used the lines in the blocks as my guide and spaced my lines about 1/4" inch out. I think the end result looks really interesting and compliments the craziness of the design, but it was also really easy to do (bonus!).
I need to hand stitch on some fabric in the back corners to create the pockets for the hanging dowel, and then I'll really be finished. The hubs is happy, so I am, too!
P.S. Have you guys heard about the Blogger's Quilt Festival over on Amy's Creative Side? It's a huge linky party for quilts in lots of different categories. I'm entering the Oxford Comma Quilt in the Wall Hanging Quilts category, so pop on over and check it out. The linky's open through Oct. 31, and voting runs Nov. 1-7. Good luck to anyone else who's entered a quilt!


What a lovely quilt. :))
ReplyDeleteGreat quilt. I love the Comma fabric and this is a great design for it. The angles in your design really show off the severe nature of the patterns. Love it!
ReplyDeleteWhat a fun, bright mini!
ReplyDeleteLove it Jessica! It's perfect for fall.
ReplyDeleteMy Comma quilt is getting there too and I'm looking forward to getting it finished.
Love what you've done with the Comma line!
ReplyDelete