Pages

Monday, February 27, 2017

I'm a sewing ambassador!

Early last fall, I was approached by Havel's Sewing to see if I would be interested in joining their team as a brand sewing ambassador. I was honest when I told them I'd never used their products but would be happy to give them a try and see what I thought, so they sent along a few items I requested, and boy did they win me over immediately.
I've been using my new rotary cutter, seam ripper, cutting mat, and scissors (pictured: 3.5" Double Curved Embroidery Scissors, 8" Quilting/Sewing Fabric Scissors, and 5.5" Multi-Angled Duckbill Scissors) nonstop since then, and I'm so impressed with their quality (not to mention the cute colors).
The rotary cutter is the most comfortable one I've used (and I've tried several Olfa and Fiskars models), the design of the seam ripper is genius, the shears are the sharpest I've found (plus they have a comfortable handle and that great safety cover for the tip), and the cutting mat -- oh man, let me tell you about the cutting mat.
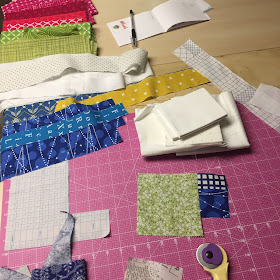
We recently reorganized our basement to give me a larger sewing space with room for a giant cutting and sewing table, in part because I really wanted a giant cutting mat. This baby joined the party as soon as the table was finished, and it's made such a difference.
I love its large size, tons of markings, and the fact that the measurements are marked on all four sides (ostensibly to make cutting easier for both lefties and righties, but it also means I can move around the mat as I'm cutting or measuring and always have markings to guide me, no matter which side I'm on). Oh, and it's reversible. And pink. What's not to love?
I'm actually taking over the Havel's Instagram feed this week, so follow along to see what else I'm working on and a little more about my favorite products. And if you're interested to try some out for yourself, you can use the code "blueskycrafter7" for $7 off purchases of $25 or more on the Havel's website. The code is good for the entire year, so feel free to use it again and again. Happy shopping!

Monday, February 6, 2017

In the kitchen

Still feeling in the Christmas spirit? At least these have some pink and red in them, so you can pretend they're for Valentine's. :) I'd been meaning to make a new Christmas table runner for our dining room for I don't know how long, so back in December, I finally decided it had to be finished, and I'd hoarded these Cotton + Steel tumblers for far too long.
Considering just how cute those glasses are on their own and knowing I had a million other projects on my list, I decided to keep it uber simple by just doing a whole-cloth runner.
I always like my runners to be double sided, so I went with these super cute winter foxes (Cool Foxes in Aqua from the Polar Pals collection) for the other side. I only had a fat quarter, so I made up the difference with a red and white dot from my stash. Simple diagonal quilting, plus a Dear Stella red netting, which made the perfect binding for both sides, and I was done.
They make for a wintery side that's not overtly Christmasy, and they've been staring up at us since New Year's.
For part of my sister's Christmas gift, I decided to make her an apron to go with some kitchen utensils she'd requested. I used this fabulous tutorial from Purl Soho. The main part of the apron is Essex Yarn-Dyed Linen in Peacock, and the fun little pocket is Sushi's Antiques from Sarah Watts's From Porto With Love collection. I used webbing for the straps. It's simple but cute and super functional. I predict there will be one of these for me (and, I suspect, the hubs) in my future.

Saturday, February 4, 2017

Pixie baskets

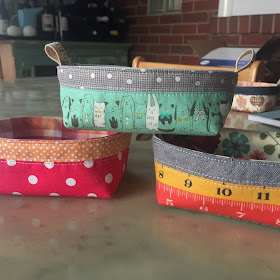
When I started debating what to make for B's teachers for Christmas, my mind wandered back to the Pixie Basket tutorial from Fabric Mutt, which I'd pinned and then longed to make ever since. So I sorted through my scrap basket and got to work ... on eight of them.
Thankfully, these go together pretty quickly, and I simplified a few of them by not including the contrasting band at the top. His teachers wound up with three apple-themed baskets, which I filled with chocolate truffles.
After making those, I decided the baskets would be handy for all sort of things, so I made three more for our guild's annual Christmas raffle. I filled them with mini charm packs and a few fat eighths.
And, of course, I couldn't not make one for myself. Mine now holds all of my wonder clips and is so handy. Finally, I made one for B to hold some treasures. This Ann Kelle sheep fabric reminded me of one of B's favorite cartoons, Shaun the Sheep, so I couldn't resist.
I highly recommend the tutorial, which, like all of Heidi's works, is so well written. These cuties are great for all kinds of things, and I suspect I'll have more making in my future.

Wednesday, February 1, 2017

February do.Good Stitches blocks

February is my next month as quilter for the Emerge Circle of do.Good Stitches, and gosh darn it, I wanted to do something cute and fun, so I decided to give into the strawberry block cuteness that's been floating around IG for a while.
The pink and red color scheme also seemed perfect for Valentine's, and it's a great scrappy block, so hopefully my bee mates will enjoy it. We are following this great tutorial by Skyberries Handmade, but I changed up the dimensions to make a larger block.
Bee mates, follow the Skyberries Handmade tutorial to make just one block (yay!) using the following dimensions instead of the dimensions in the tutorial:
PINK/RED
17 - 3" squares
3 - 3.5" squares


GREEN
2 - 3.5" squares from print A
2 - 3.5" squares from print B
2 - 3" squares from print C (or one 5.5 x 3" rectangle if you don't want to piece it)


WHITE
4 - 3" squares
5 - 3.5" squares

Your final block will measure 13 x 18". Use a range of pink, red, or both prints for the berry
(no dull tones, please -- we want cheery strawberries!); white or low-volume prints for the background; and three different green prints for the leaves (prints A and B) and stem (print C).
Use the 3.5" squares to make your HSTs, which you will trim to 3" and then proceed with piecing. Please press your seams open. Have fun!